JUnit con DataClassG
0. ESQUEMA

Services:
Test:
Se crearán las clases para test de las clases Services.
Form:

Otra prueba del test, funciono el metodo testInsert, indicando que se inserto el registro, pero no lo puedo eliminar ni actualizar.
Si se ejecutan las pruebas nuevamente
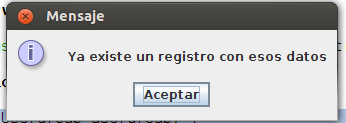
si el test falla se enviaran mensajes de dialogo como este, esto puede ser un inconveniente si deseamos usar un sistema de integración continua. Más adelante mostraremos la otra forma de hacerlo.
La ventaja de usar el Warning en el controller es que el invocar el services no tendríamos que generar estas advertencias en el método que realiza el llamado.
En la clase donde se invoca sólo usaríamos el siguiente código.

0. ESQUEMA
Services:
Por cada beans crearemos una clase Services que se encargará de interactuar con el controller para realizar las operaciones de la base de datos.
Se crearan los métodos insert, update,delete y los demas metodos para realizar las diversas operaciones.
Test:
Se crearán las clases para test de las clases Services.
Form:
Los formularios para la interactuar con el usuario.
ProvinciasServices.java colocamos los métodos, insert, update,delete
public class ProvinciasServices {
ProvinciasController provinciasController = new ProvinciasController();
public ProvinciasServices() {
}
public Boolean insert(Provincias provincias){
try{
if(provinciasController.insert(provincias)){
return true;
}else{
Mensajeria.MensajeWarning(provinciasController.getMensaje(), "insert()");
}
} catch (Exception ex) {
Mensajeria.MensajeError(ex,"insert()");
}
return false;
}
public Boolean update(Provincias provincias){
try{
if(provinciasController.update(provincias)){
return true;
}else{
Mensajeria.MensajeWarning(provinciasController.getMensaje(), "update()");
}
} catch (Exception ex) {
Mensajeria.MensajeError(ex,"update()");
}
return false;
}
public Boolean delete(Provincias provincias){
try{
if(provinciasController.delete(provincias)){
return true;
}else{
Mensajeria.MensajeWarning(provinciasController.getMensaje(), "delete()");
}
} catch (Exception ex) {
Mensajeria.MensajeError(ex,"delete()");
}
return false;
}
}
Ahora creamos el test a partir de la clase existente.
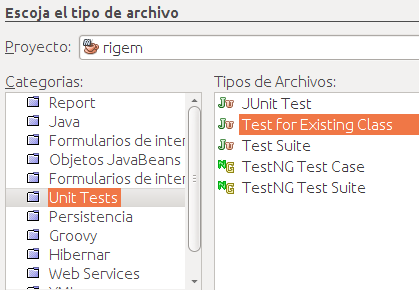
Antes de crear la clase en el paquete pruebas seleccionar JUnit Test, y en categorías Test for Existing Class
Antes de crear la clase en el paquete pruebas seleccionar JUnit Test, y en categorías Test for Existing Class
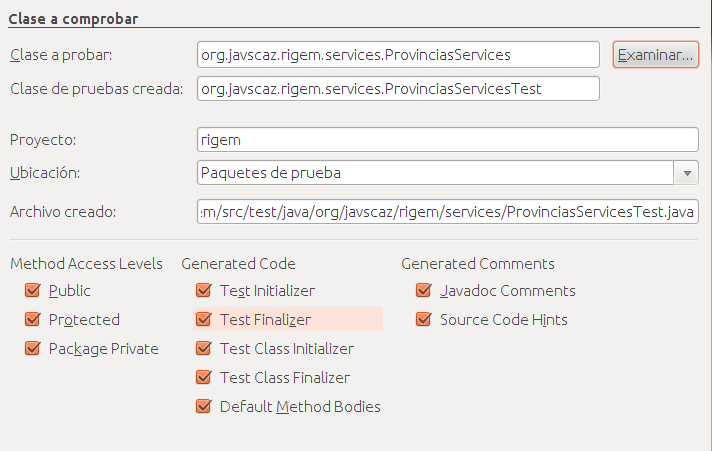
Seleccionamos la clase
Clase de test generada
Clase de test generada
Se generan los métodos con la palabra test al inicio
public class ProvinciasServicesTest extends TestCase {
public ProvinciasServicesTest(String testName) {
super(testName);
}
@Override
protected void setUp() throws Exception {
super.setUp();
}
@Override
protected void tearDown() throws Exception {
super.tearDown();
}
/**
* Test of insert method, of class ProvinciasServices.
*/
public void testInsert() {
System.out.println("insert");
Provincias provincias = null;
ProvinciasServices instance = new ProvinciasServices();
Boolean expResult = null;
Boolean result = instance.insert(provincias);
assertEquals(expResult, result);
// TODO review the generated test code and remove the default call to fail.
fail("The test case is a prototype.");
}
/**
* Test of update method, of class ProvinciasServices.
*/
public void testUpdate() {
System.out.println("update");
Provincias provincias = null;
ProvinciasServices instance = new ProvinciasServices();
Boolean expResult = null;
Boolean result = instance.update(provincias);
assertEquals(expResult, result);
// TODO review the generated test code and remove the default call to fail.
fail("The test case is a prototype.");
}
/**
* Test of delete method, of class ProvinciasServices.
*/
public void testDelete() {
System.out.println("delete");
Provincias provincias = null;
ProvinciasServices instance = new ProvinciasServices();
Boolean expResult = null;
Boolean result = instance.delete(provincias);
assertEquals(expResult, result);
// TODO review the generated test code and remove the default call to fail.
fail("The test case is a prototype.");
}
}
Agregar debajo de la definición de la clase
DataGManager dataGManager = new DataGManager();
Connection OpenConnection = dataGManager.OpenConnection();
Esto es para utilizar DataGManager
Ahora comentados todos las instrucciones fail de todos los métodos
comentados
DataGManager dataGManager = new DataGManager();
Connection OpenConnection = dataGManager.OpenConnection();
Esto es para utilizar DataGManager
Ahora comentados todos las instrucciones fail de todos los métodos
comentados
En el método testInsert()
En la línea Boolean expResult = null; indica el valor de retorno del método
esperamos que el método insert() devuelva true.asíi que colocamos el valor que esperamos que retorne el método si la operación fue exitosa
Boolean expResult = true;
public void testInsert() {
System.out.println("insert");
Provincias provincias = null;
ProvinciasServices instance = new ProvinciasServices();
Boolean expResult = null;
Boolean result = instance.insert(provincias);
assertEquals(expResult, result);
// TODO review the generated test code and remove the default call to fail.
// fail("The test case is a prototype.");
}
Localizamos el objeto provincias
Provincias provincias = null;
usamos el operador new al objeto provincias
Provincias provincias = new Provincias();
y le asignamos valores al objeto que será pasado al método insert
provincias.setProvincia("Los Santos");
provincias.setIdprovincia("7");
Quedaría de la siguiente manera
public void testInsert() {
System.out.println("insert");
Provincias provincias = new Provincias();
provincias.setProvincia("Los Santos");
provincias.setIdprovincia("7");
ProvinciasServices instance = new ProvinciasServices();
Boolean expResult = true;
Boolean result = instance.insert(provincias);
assertEquals(expResult, result);
// TODO review the generated test code and remove the default call to fail.
// fail("The test case is a prototype.");
}
Ajustamos los métodos update y delete.
Clase terminada
public class ProvinciasServicesTest extends TestCase {
public ProvinciasServicesTest(String testName) {
super(testName);
}
@Override
protected void setUp() throws Exception {
super.setUp();
}
@Override
protected void tearDown() throws Exception {
super.tearDown();
}
/**
* Test of insert method, of class ProvinciasServices.
*/
public void testInsert() {
System.out.println("insert");
Provincias provincias = new Provincias();
provincias.setProvincia("Los Santos");
provincias.setIdprovincia("7");
ProvinciasServices instance = new ProvinciasServices();
Boolean expResult = true;
Boolean result = instance.insert(provincias);
assertEquals(expResult, result);
// TODO review the generated test code and remove the default call to fail.
// fail("The test case is a prototype.");
}
/**
* Test of update method, of class ProvinciasServices.
*/
public void testUpdate() {
System.out.println("update");
Provincias provincias = new Provincias();
provincias.setProvincia("Los Santos.");
provincias.setIdprovincia("7");
ProvinciasServices instance = new ProvinciasServices();
Boolean expResult =true;
Boolean result = instance.update(provincias);
assertEquals(expResult, result);
// TODO review the generated test code and remove the default call to fail.
// fail("The test case is a prototype.");
}
/**
* Test of delete method, of class ProvinciasServices.
*/
public void testDelete() {
System.out.println("delete");
Provincias provincias = new Provincias();
provincias.setIdprovincia("7");
ProvinciasServices instance = new ProvinciasServices();
Boolean expResult = true;
Boolean result = instance.delete(provincias);
assertEquals(expResult, result);
// TODO review the generated test code and remove the default call to fail.
// fail("The test case is a prototype.");
}
}
Ejecutamos el test
Podemos ver el resultado del test
No pasó el testInsert(), Indica que no se insertó, ya que había un registro con ese idprovincia en la tabla,testDelete no lo paso ya que el registro estaba relacionado u otra situación indicandonos que debemos revisar esos métodos.
Otra prueba del test, funciono el metodo testInsert, indicando que se inserto el registro, pero no lo puedo eliminar ni actualizar.
Si se ejecutan las pruebas nuevamente
si el test falla se enviaran mensajes de dialogo como este, esto puede ser un inconveniente si deseamos usar un sistema de integración continua. Más adelante mostraremos la otra forma de hacerlo.
La ventaja de usar el Warning en el controller es que el invocar el services no tendríamos que generar estas advertencias en el método que realiza el llamado.
En la clase donde se invoca sólo usaríamos el siguiente código.
Comments
Also visit my web blog genghis khan quotes
I found a sea shell and gave it to my 4 year old daughter and said "You can hear the ocean if you put this to your ear." She placed the
shell to her ear and screamed. There was a hermit crab inside and it pinched her ear.
She never wants to go back! LoL I know this is totally off topic but
I had to tell someone!
My blog tired quotes
Does running a well-established website like yours take
a large amount of work? I am brand new to operating a blog however I do write in my journal every day.
I'd like to start a blog so I can share my own experience and thoughts online. Please let me know if you have any ideas or tips for brand new aspiring blog owners. Appreciate it!
Look into my web blog: future quotes
Anyways, I'm certainly pleased I stumbled upon it and I'll be bookmarking it and checking back regularly!
Feel free to visit my web site; friedrich nietzsche quotes
. Superb .. I will bookmark your blog and take the feeds additionally?
I am glad to search out a lot of helpful information right here within the post, we'd like work out more strategies on this regard, thanks for sharing. . . . . .
Here is my blog post; madea quotes
I guess I'll just sum it up what I submitted and say, I'm thoroughly enjoying your blog.
I as well am an aspiring blog blogger but I'm still new to everything. Do you have any helpful hints for newbie blog writers? I'd really appreciate
it.
Feel free to surf to my web blog :: frank ocean quotes
Take a look at my web page; future quotes
My last blog (wordpress) was hacked and I ended up losing many months of hard work due to no data backup.
Do you have any solutions to prevent hackers?
Here is my page :: e. e. cummings quotes
issues with your website. It appears like some of the text in your content are running
off the screen. Can someone else please provide feedback and let me know if this is happening to them as
well? This may be a problem with my internet browser because
I've had this happen previously. Appreciate it
Also visit my webpage; unusual animals
I'd be very thankful if you could elaborate a little bit more. Kudos!
Here is my blog - letting go quotes
create a really good article… but what can I say… I put things off a whole lot and never manage to get nearly anything done.
Feel free to visit my site - discipline quotes
getting knowledge.