Reportes iReport + Java Server Faces + JPA

Reportes iReport + Java Server Faces + JPA

Crearemos un reporte de usuarios mostrando el grupo de usuario que pertenece el otro  Entity


r.png


Entity Usuarios

Si observamos existe el atributo idgrupousuario de tipo Grupousuario
public class Usuarios implements Serializable {
   @Basic(optional = false)
   @NotNull
   @Size(min = 1, max = 70)
   @Column(name = "tema")
   private String tema;


   @JoinColumn(name = "idmunicipio", referencedColumnName = "idmunicipio")
   @ManyToOne(optional = false)
   private Municipios idmunicipio;
   private static final long serialVersionUID = 1L;
   @Id
   @Basic(optional = false)
   @NotNull
   @Size(min = 1, max = 35)
   @Column(name = "username")
   private String username;
   @Basic(optional = false)
   @NotNull
   @Size(min = 1, max = 150)
   @Column(name = "password")
   private String password;
   @Basic(optional = false)
   @NotNull
   @Size(min = 1, max = 60)
   @Column(name = "nombre")
   private String nombre;
@JoinColumn(name = "idgrupousuario", referencedColumnName = "idgrupousuario")
   @ManyToOne(optional = false)
   private Grupousuarios idgrupousuario;


Editamos el Entity Grupousuario

En el mƩtodo toString() retornamos el atributo que deseamos mostrar


public class Grupousuarios implements Serializable {
   private static final long serialVersionUID = 1L;
   @Id
   @Basic(optional = false)
   @NotNull
   @Size(min = 1, max = 35)
   @Column(name = "idgrupousuario")
   private String idgrupousuario;
   @Basic(optional = false)
   @NotNull
   @Size(min = 1, max = 50)
   @Column(name = "grupousuario")
   private String grupousuario;


@Override
   public String toString() {
      // return "com.javscaz.rigemjsf.Grupousuarios[ idgrupousuario=" + idgrupousuario + " ]";
       return grupousuario;
   }


DiseƱamos el reporte

Agregar los atributos en Fieldsf.png
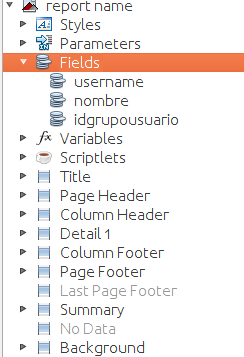

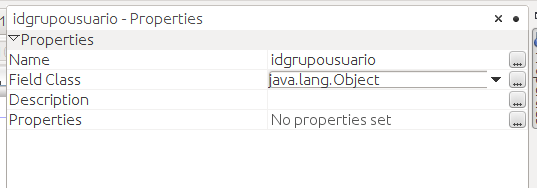
Nos ubicamos en el atributo idgruposusuario y seleccionar propiedades, en Field Class colocamos java.lang.Object
con esto invocaremos el mƩtodo toString() del entity Grupousuario.f.png


Arrastramos los atributos al reporte.

d.png

Comments

Popular posts from this blog

Tutorial bƔsico de aplicaciones Web con NetBeans parte 1

NetBeans ofrece un excelente soporte para el desarrollo de aplicaciones Web, en esta ocasiĆ³n lo haremos utilizando el Framework Java Server Faces 2.0. En el Menu Seleccionamos Nuevo->Proyecto y luego en Categorias Java Web y en tipo de Proyectos Web  Application indicamos el nombre del proyecto Seleccinamos el servidor Web, usamos GlassFish ya que este soporta EJB3.0 y JSF 2.0 Framework Java Server Faces El IDE genera el esquelto del proyecto Web Pages   almacenamos las paginas .html, xhtml, jsf, los archivos de recursos, los scripts .js, imagenes Source Packages    Son las clases Java  Test Packages    Son las clases que usamos para los Test Libraries     Tenemos las bibliotecas de Java y GlassFish necesarias para ejecutar la aplicaciĆ³n Web. Test Libraries     EstĆ”n las bibliotecas usadas para los test  Configuration Files    Archivos de configuraciĆ³n de la aplicaciĆ³n. Ejecutamos la...

Incrementar Memoria NetBeans

Algunas veces necesitamos incrementar la memoria para un mejor rendimiento. http://www.netbeans.org/community/releases/55/uml-download.html Este es un ejemplo para UML. DescripciĆ³n en ingles. Increasing Memory Settings (applicable to all builds) The default memory settings for NetBeans should be increased for UML projects. If you have the available memory, Locate your NetBeans installation directory ($install_dir). This can be found by starting up NetBeans and selecting Help -> About then select the Detail tab. Edit the $install_dir/etc/netbeans.conf file. Find the line defining netbeans_default_options . Increase the maximum memory attribute to -J-Xmx512m. If you experience heap overflows while working with larger files, you should increase this value further.

Cambiando el estado de un checkbox

Cambiando el Estado de un CheckBox Algunas veces deseamos controlar el estado de un checkbox o cambiarlo segĆ¹n determinadas condiciones. Pasos: 1. Creamos un proyecto Web. 2. En el diseƱador agregamos un checkbox y dos botones. * Dar click derecho en el checkbox y luego seleccionar Add Binding Attribute, para agregar los atributos al checkbox, de manera que los podamos usar en nuestro cĆ³digo. Generando automĆ”ticamente private Checkbox checkbox1 = new Checkbox(); public Checkbox getCheckbox1() { return checkbox1; } public void setCheckbox1(Checkbox c) { this.checkbox1 = c; } 3.Damos click derecho en el botĆ³n Habilitar, y seleccionamos Edit Action Event Handler. A continuaciĆ³n, agregamos el cĆ³digo: this.checkbox1.setSelected(true);, el mĆ©todo setSelected con valor true, marca el checkbox como seleccionado, y un valor de false, quita la marca. public String button1_action() { // TODO: Process the action. Return value is a navigation // ...